Archives

Zucchini Fritters

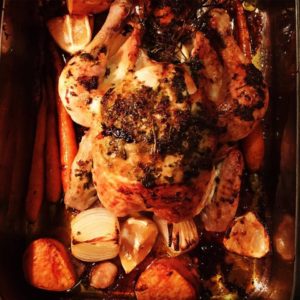
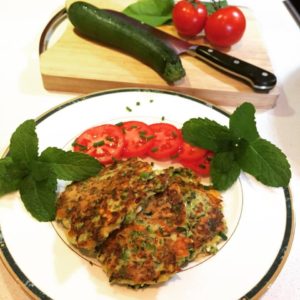
These are easy and so delicious for the non-meat lunches or dinner days, I started making them when my children were little and they are now adults and still request them, this makes me happy.

Ingredients:

  • 500gms zucchini,, grated
  • ½ tsp sea salt
  • 8  green spring onions, chopped
  • 125gms Greek feta, crumbled
  • ½ cup fresh flat leaf parsley, chopped
  • ¼ cup fresh mint, chopped
  • 2 eggs, lightly beaten
  • ½ cup plain flour
  • sea salt and freshly ground black pepper
  • 2 tbsp olive oil for frying

Method:

  1. Put the zucchini in a colander and sprinkle with the sea salt, toss lightly and set aside for 30 minutes.  Squeeze out the excess liquid from the zucchini and pat dry with paper towels.
  2. Put the zucchini, spring onions, feta, parsley, mint and eggs in a bowl and stir lightly to combine.  Stir in the flour , salt & pepper.
  3. Heat the oil in a non-stick frying pan over a medium heat and drop heaped tablespoon of mixture into the hot oil, flattening gently with a spatula.
  4. Cook for 2 minutes on each side until golden brown.
  5. Drain on paper towels and serve yoghurt mixed with a little lemon juice & olive oil and seasoned with salt and pepper.

Don’t forget to leave a comment so I can see if you enjoyed this recipe I love feedback ♥

Green Tomato Pickles

This recipe is my dear departed grandmother Edna’s, I have been making them for years, they are so delicious, and can be served with meat, or on a ham or cheese sandwich to add that extra zing!

Ingredients:

  • 3kg green tomatoes, finely chopped
  • 1 kg brown onions, finely chopped
  • 3 tbsp salt
  • 3 cups cider vinegar
  • ½ tsp freshly ground black pepper
  • 1 kg sugar (if you are health conscious add a little less, but the vinegar & sugar preserve the pickles)
  • 8 tbsp cider vinegar, extra
  • 3 tbsp curry powder, level not heaped
  • 3 tbsp mustard powder, level not heaped

Method:

  1. Combine the tomatoes and onions in a bowl, sprinkle with salt and mix well.  Cover and leave to stand overnight.
  2. The next day, drain off the liquid.
  3. Place the tomatoes and onions in a large saucepan, add the vinegar, pepper and sugar and bring to the boil.   Boil for 60 minutes, stirring often.
  4. Mix the extra vinegar with dry spices and stir into the green tomato and onion mixture.
  5. Boil for 5 minutes or until thickened and well combined.
  6. Pour into sterilised jars and seal.

You can eat these amazing pickles immediately or store in a cool, dry and dark place for up to 2 years.  Along with my zucchini pickles these have to be my favourite!


Don’t forget to leave a comment for me when you make them and let me know how you enjoyed my recipe I love feedback.

Slow cooked spicy lamb shoulder

This spicy lamb shoulder is absolutely delicious…it is melt-in-your-mouth lamb with a fantastic spicy zing!  Great as pulled lamb served on flatbread with coleslaw the next day….two meals out of one!

Ingredients:-

  • 1 lamb shoulder
  • 1 brown onion, quartered
  • 200mls water
  • fresh parsley to garnish
  • 1 tbsp cumin
  • ½ tbsp Spanish smoked paprika
  • ½ tbsp sumac
  • ½ tsp cinnamon
  • ¼ tsp ground ginger
  • ½ tbsp grated ginger
  • 2 garlic cloves, chopped & crushed with the blade of a knife
  • ½ tsp freshly ground black pepper
  • ½ tbsp sea salt flakes (less if it is finely ground)
  • 1 tbsp fresh lemon juice
  • 2½ tbsp olive oil

Method:-

  1. Combine the cumin, paprika, sumac, cinnamon, ground and grated ginger, garlic cloves, pepper and salt.
  2. Add the olive oil and lemon juice.
  3. Make lots of slits in the lamb with a sharp knife, and rub the paste in all over pressing it into the slits.  If you have time let it marinate for 4 hours in fridge.  (If you chose not to this it will still be fine, but it will give more flavour).
  4.  Place the lamb in a baking dish fat side up, and place onion quarters around, and pour the water into the dish, not over the lamb.  Cover with foil.
  5. Place dish in BBQ in the middle, with the jets on low at the sides not under the lamb, temperature should be around 170°C.  Roast for 2½ hours with foil on, then remove foil and roast for another 2 hours, or until lamb is tender and pulls away easily from the bone.
  6. Serve on a platter with fresh chopped parsley sprinkled over.

Enjoy!  Please leave a comment below and/or on the Instagram page to let me know how you liked it

NOTE:- This recipe can be done in the oven the same way, or in a slow cooker for about 6-7 hours with no changes to the ingredients, water or method.

This entry was posted on February 6, 2017, in Recipes.

Moroccan Chicken Salad

A dear friend gave me this unique and delicious recipe many years ago and I still make it often, and none of my guests every tire of it and neither do I!

Ingredients:-

  • 2 Free Range Chicken Breasts
  • 1 bunch Rocket leaves
  • 1 mango, sliced
  • ½ cup fresh dates, sliced and de-seeded
  • 1 pomegranate, seeds removed for sprinkling over salad
  • ¼ cup pinenuts, toasted
  • 1 Lebanese cucumber, sliced
  • 3 radishes, sliced (optional)

Dressing:-

  • ½ cup extra virgin olive oil
  • 1 tbsp Pomegranate molasses
  • Juice 2 lemons
  • 1 tsp ground cumin
  • ½ tsp Spanish smoked paprika

Mix together in a jar.

Method:-

  1. Poach chicken breasts in a saucepan with 1 onion, 1 stalk celery cut in chunks, 1 carrot cut in chunks, 1 tsp peppercorns, and ½ tsp salt covered in water for 10 minutes, leave to go cold in the poaching liquid. Alternatively you can gently fry the breasts, don’t let the outside become crisp, keep the temperature low.
  2. Spread rocket leaves around a large platter or dish, arranged sliced chicken pieces on top, add mango, dates, cucumber, radishes, and sprinkle over pinenuts.
  3. Pour dressing over salad and finish with pomegranate seeds sprinkled over for colour and crunch.

Enjoy!!!!  Leave a comment below or on the Instagram post to let me know how you enjoyed this recipe ♥


This entry was posted on February 4, 2017, in Recipes.

Chicken Pilaf

I devised this recipe when one day I stood staring a two chicken breasts I had ready to cook, and wondered what the heck I was going to do with them for dinner….it’s absolutely yummy!

Ingredients:-

  • 2 free range chicken breasts, cut into long pieces
  • 1 large brown onion, sliced
  • 1 green capsicum, sliced into strips
  • handful fresh beans, chopped into small pieces
  • handful of chopped butternut pumpkin (optional I don’t always put this in)
  • 2 cloves garlic, chopped
  • 1 long red chilli, sliced
  • 2 tbsp olive oil
  • 2tsp curry powder
  • 1 litre chicken stock
  • 1 cup Basmati rice

Method:-

  1. Heat olive oil in a frying pan with deep sides, when soft add chicken pieces and brown on both sides.
  2. Add curry power and toss through.
  3. Add capsicum, beans, pumpkin( if you are including it), garlic and chilli and saute for 2 minutes.
  4. Add chicken stock and bring to boil, reduce heat and let simmer for 15 minutes.
  5. Add rice and stir through.
  6. Simmer, stirring often until rice is cooked, add more stock if mixture becomes dry, as it is meant to have a nice sauce to serve.

Serve with fresh parsley as a garnish.  Serves 4………Enjoy!!!


This entry was posted on February 2, 2017, in Recipes.

Blueberry Muffins

These are the easiest and yummiest muffins you will ever eat!   10 minutes to make and 5 minutes for them to disappear!

Ingredients:-

  • 175gms self raising flour
  • 110gms caster sugar
  • ½ tsp vanilla extract
  • 1 egg, lightly beaten
  • 50gms unsalted butter, melted
  • 125ml milk
  • ½ tsp grated lemon rind
  • 100gms fresh or frozen blueberries

Method:-

  1. Preheat oven to 190°C (170°C fan forced)
  2. Place mini muffin paper cases into two 12 hole mini muffin trays
  3. Sift four into a large bowl, add sugar and mix.
  4. Add combined vanilla, eggs, butter and milk and lemon zest, stir through gently.
  5. Gently fold through blueberries
  6. Drop a heaped teaspoon full into cases, until ¾ full.
  7. Place trays into the oven and bake about 20 minutes until pale golden colour.
  8. Stand on wire rack to cool…..or eat straight away they are delicious while still warm!

Enjoy!!  Makes about 24

Leave a comment below and/or on the Instagram post to let me know how you liked the recipe ♥

Citrus Syrup Cakes

These little citrus syrup cakes are so awesome and packed with flavour you will want to make this recipe over and over again.  I once served them to a chef who stayed at my B &B and he asked for the recipe..I was quite chuffed 🙂

Ingredients:-

  • 113g unsalted butter, softened
  • 113g sugar
  • 2 large eggs
  • zest of 1 lemon & 1 lime
  • 160g self raising flour
  • pinch of salt
  • 4 tbsp milk

Syrup:-

  • 2 tbsp lime juice, plus zest for decoration
  • 2 tbsp lemon juice, plus zest for decoration
  • ½ cup icing sugar

Preheat oven to 180°C/160°C fan, and butter two cupcake pans.

Method:-

  1. Cream together the butter and sugar, add the eggs one at a time and the zest, beating well.
  2. Fold in the flour and salt gently, then add the milk.
  3. Spoon into the cupcake pans and cook for 20-25 minutes.

While cakes are cooking, prepare the syrup by putting the lime and lemon juices and sugar into a small saucepan and heating gently until the sugar dissolves.

As soon as the little cakes are cooked, take them from the oven and prick them several times with a small skewer.

Pour the syrup over them evenly, making sure it is on the edges as well as the middle.

Let the cakes cook slightly (½ hour or so ), until all the syrup is absorbed.  Don’t leave them for more than an hour otherwise they will be difficult to remove.

Turn out onto a wire rack and decorate them with the lemon and lime zest.

Makes about 10-12…………..Enjoy! Leave a comment below and/or on the Instagram post to let me know how you enjoyed the recipe ♥

This entry was posted on January 29, 2017, in Recipes.

Roast Lemon & Herb Chicken

 So easy and so delectable I love one pot dinners ♥♥♥

Ingredients:-

  • 1 x free range chicken about 1.5 kg
  • 50g butter softened
  • handful of fresh herbs, thyme, rosemary, tarragon & parsley leaves picked, roughly chopped
  • 4 garlic cloves, 1 mashed, the other 3 left whole but squashed
  • 2 lemons
  • 1 onion, roughly chopped
  • 2 bay leaf
  • 1 tbsp plain flour
  • 250ml chicken stock
  • 2 onions, quartered
  • 2 bay leaf
  • 1 tbsp plain flour
  • 250ml chicken stock

Method:-

  1. Heat oven to 200°C/180°C fan. In a small bowl, mash the butter with half of the herbs, the mashed garlic and the juice of half a lemon. Mix everything together with some seasoning and set aside.
  2. Use your hand to loosen the chicken skin away from the breast, then push most of the butter mix under the skin. Rub the rest of the butter all over the outside of the chicken, then stuff the cavity with the a few lemon halves, remaining herbs and stalks, and the garlic.
  3. Scatter the onion, remainder of lemon halves and bay leaves over the base of a small roasting tin. Sit the chicken on top, breast-side up, and roast on the middle shelf for 1 hr 30 mins, basting with the buttery juices after about 40 mins. When the chicken is dark golden, crispy-skinned and the juices run clear, remove from the oven and remove to rest on warm plate for 15 mins.
  4. To make the gravy, remove bay leaves and onions, and squeeze the juice out of the cooked lemon halves and discard the skins. Place the pan on a low heat, stir in flour and sizzle until light brown. Gradually pour in the stock and cook for a few mins. If you like a darker gravy, add a splash of soy sauce to the tin. Strain the gravy into a jug and serve with the chicken.

Enjoy!  Leave a comment below or/and on the Instagram page to let me know how you liked the recipe ♥

This entry was posted on January 23, 2017, in Recipes.

Chocolate shortbread

I love making and eating these delightful buttery shortbread, they are really so easy it’s all done in the food processor in minutes…♥♥♥♥

Ingredients:

  • 200g unsalted butter, chilled & chopped
  • ¼ cup Dutch coca powder (Dutch cocoa is much better quality and worth using)
  • ¹⁄³ cup rice flour
  • 1 cup plain flour
  • ¾ cup icing sugar mixture
  • 2 tsp vanilla extract (pure)

Method:

  1. Process butter, cocoa, rice flour, plain flour and icing sugar until mixture resembles breadcrumbs.
  2. Add vanilla and process until mixture comes together.
  3. Shape into a log and wrap in baking paper or cling film, twisting ends to seal.
  4. Refrigerate for 30 minutes. (this hardens the dough so you can cut it nicely)
  5. Preheat oven to 180°C/160°C fan forced.
  6. Line 3 baking trays with baking paper.
  7. Slice the dough log into rounds and place onto baking trays.  You may need to do this in two or three stages if the dough gets too soft and sticky, put it back into the refrigerator while one or two trays bake, depending on the size of your oven.
  8. Bake for 6-8 minutes or until edges are just firm to touch.
  9. Stand on tray for 5 minutes then transfer to a wire rack to cool completely.

Enjoy!!!  As always let me know how you went with this recipe I love feedback, you can do it below or on the Instagram post for these lovelies ♥


This entry was posted on December 9, 2016, in Recipes.

Chocolate Brownies

chocolate-brownieThese have to be the most delicious gooey chocolate brownies I have ever made ♥♥♥♥…enjoy!!!

Ingredients:

  • 125g unsalted butter -chopped

Method:

  1. Preheat oven to 180°C/160°C fan forced. Grease a 20cm square cake pan and line with baking paper.
  2. Place butter and chocolate in a heatproof bowl over a saucepan of simmering water (don’t let the bowl touch the water). Stir with a metal spoon until melted. Remove from heat.
  3. Quickly stir in eggs, sugar, flour, cocoa powder, vanilla and salt until combined. Pour into prepared cake pan.
  4. Bake for 35 minutes or until a skewer inserted in the centre comes out with moist crumbs clinging.
  5. Set aside to cool completely. They are best made the day before.

  6. Cut into 16 squares.

Enjoy!!  Please leave me a comment below or on the Instagram post if you have tried this recipe I love feedback ♥  If you leave a comment in both places you will get brownie points 🙂


This entry was posted on November 3, 2016, in Recipes.