 I have been making yeasted bread for years, but when I started making sourdough from my own naturally fermented starter I entered a new world of love and addiction ♥
This process of sourdough bread-making is thousands of years old and is so good for you and your gut health. If you are one of the thousands of people who bloat from supermarket breads, like me, you will never go back. You can of course buy sourdough bread from artisan bread-makers, but there is nothing like making your own.
It is a time driven process, but it so very very much worth it. I will share a few recipes of mine with you that vary in time frames, but if you have a day at home you can make absolutely fantastic sourdough bread yourself.
Flour:- You have to have great flour, organic preferably, and a strong flour to give strong gluten development and hence great crust and crumb. I recommend three types, strong whole white, spelt, and rye, this combination makes wonderful bread, and as you get more proficient you can vary the amounts and change them around.
The Starter:- This will be the longest process you will go through to get your own sourdough bread underway, and it generally takes between 5-10 days to develop a good healthy starter. You have to think of your starter as a family member, it needs feeding every day to be kept healthy, and active, and in turn it will reward you with fantastic bread.
- Day I – Mix 2 slightly heaped tbsps of white bread flour & 1 heaped tbsp rye flour and mix with 3 tbsp bottled spring water, mixture should be stiff, not runny. Mix together in a tall jar. Scape down the sides. Cover loosely with a towel, I use a small square of material held on with an elastic band. You can use the lid of the jar not screwed on, as air needs to get into the jar. This process of a starter is to get natural yeasts from the flour you feed it and the air.
- Day 2 – Discard half, then repeat day 1 feeding process.
- Day 3 – Repeat Day 2, but feed twice and discard half before each feed, both in the morning and the evening before you go to bed.
- Day 4 – Repeat Day 3
- Day 5- Repeat Day 3 – you should see some action by now, bubbles on the surface and on the side of the jar
- Day 6 – Repeat Day 3
- Day 7 – Repeat Day 3
- Day 8 – Repeat Day 3 – now we can test to see if you starter is ready, it still might take another day or two.
Test for starter readiness:- Fill a glass with water and take one teaspoon of your starter and gently drop into the water, if it floats it’s ready!!!! If it doesn’t keep feeding another day or two and keep testing. This test you can use every time you bake to see if you starter is strong and ready to bake.
Maintenance of starter:- I like to leave my starter on the bench to remind me to feed it, and I like to feed it morning and night as I bake twice a week, and make sourdough flatbread and pancakes in-between. If you only bake once a week, then keep it in the fridge, but this time put a lid and seal it, otherwise it will dry out and form a skin on top (not good). Bring it out the night before you bake and feed it two or even three times spaced apart by about 5 hours to get it strong. You can make bread by using some of your starter straight from the jar, or by making a levain, (a part of your starter taken out and given big feeds to make it really active), all bakers prefer either way, I do both.
Now you can bake bread!!!!!!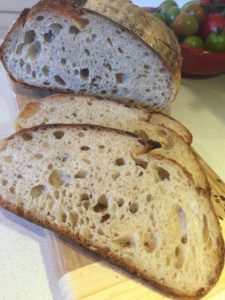
Sourdough with rye and spelt (75% white and 25% wholewheat, 75-80% hydration)
Ingredients:-
- 389gms strong white bread flour
- 20gms rye flour
- 37gms spelt flour
- 304gms spring water
- 9gms salt
- 52gms starter
Method 1: The night before baking:
- Mix all the above ingredients except starter, its sort of an autolyse but it has salt. Just mix to a shaggy lump, cover with a plastic bag (I use a clear shower cap) Leave on bench overnight if its cool weather. If it’s hot weather place in the fridge for an hour or two, then place on bench overnight.
- The next morning weigh out the starter and mix into the dough mixture with a squeezing process, just a minute. Once the stater is mixed in start kneading the dough in the bowl (as per video below) for about 7-10 minutes until you feel it become stronger.
- Let rest for 15 minutes then knead again in the bowl for another 5-6 minutes.
- Place into a clean bowl for the stretching and folding you will do over the next 5 hours or so. I like to use a stainless steel bowl at this stage.
- An hour later, and every hour, wet your hand with spring-water and pull the dough up from underneath and stretch it up and fold it down over itself, Turn the bowl and repeat about 5-6 times.
- Leave for another hour and repeat every hour for 5 folds in total.
- On the 6th hour (if strong and ready fold once again and remove from bowl and place on a lightly floured or a non-stick surface to pre-round into a ball. Leave for 15 minutes.
- Turn dough over on a lightly floured surface and fold up sides and end over itself and then stitch up the dough to form a strong surface underneath.
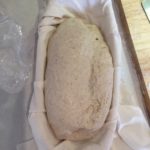
- Place fold side up into a lined proofing basket that has been dusted with rice flour and a little flour also.
- Leave to 2-4 hours to increase in size and be ready to bake, test with you finger, if it leaves a dent and it slowly comes back it is ready to bake.
Preheat Dutch oven or casserole for 30 minutes @ 250 degC.
Tip dough out of banneton onto a sheet of baking paper and bake at 250°C for 28 minutes with lid on, then remove lid and turn oven down to 230°C an take lid off and bake for another 15 minutes until the crust is crisp and brown. Leave to cool for 2 hours before cutting.
Method 2: With an overnight cold retard proof before baking (preferred for flavour & strength)
- 6.30am – Feed your starter (or levain) a big feed, twice a much as you would normally feed it in daily feeds.
- 9.30am – Make your autolyse, the same as above without the salt, mixing the 3 flours together with the water to a shaggy clump
- 12.30pm – Check to see if your starter is ready as above in starter instructions (drop a tablespoon full in a small bowl of water and see if it floats, if it does its ready if not wait a while longer and test again.
- Weigh your starter and salt and add the starter, mixing through, then add the salt and mix through and knead for 8 minutes in a bowl (as per video below) or if you are not confident with your mixer with a dough hook attachment.
- Let rest for 15 minutes.
- Knead again for another 5 minutes.
- Cover with a plastic cap or towel and leave for an hour.
- Now start your stretching and folding, once every hour for about 4-5 hours depending on the temperature of the weather, if its warm it may only take 4 hours, if it cooler then 5 hours, if its really cold it may take longer. You will see fermentation bubbles appearing to show that its ready for the next step. It will also feel stronger and stretch without tearing.
- Place onto a very lightly floured board, (I find a wooden board the best for not sticking) and pre-round with your dough scraper, folding it under itself to give a strong surface.
- Leave rest for 20 minutes.
- Now turn it over and stretch out to start shaping and stitching for the banneton. (video below and also on my Instagram and Facebook pages).
- Place into a well floured banneton (I like a mix of rice flour and bread flour) and sprinkle more bread flour on top and around the sides to stop it sticking.
- Place in the refrigerator overnight.
- When you get up, it doesn’t matter if its 6am, 7am, 8am or 9am, your bread will still be fine, and developing more flavour. Turn your oven onto 250°C (fan) and place your dutch oven into the oven to pre-heat for half an hour.
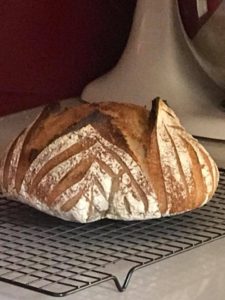
- Place a sheet of baking paper on your work surface and gently tip the dough out, score it as best you can or following my videos on Instagram, this allows it to expand in the oven. You can use a blade or a small serrated knife.
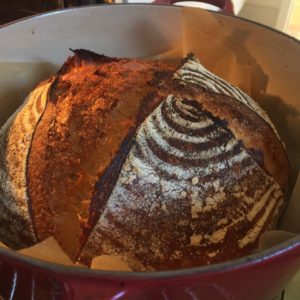
- Lift into the pre-heated dutch oven and bake for 30 minutes with the lid on, then reduce the temperature to 230°C (fan) and take the lid off and bake for another 15 minutes.
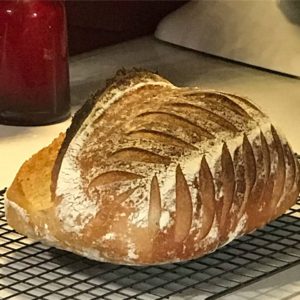
- Remove from oven and place onto a wire rack to cool, and pleeeeease resist cutting it for at least 2 hours, as it is still developing its flavour crumb structure. (I know this is hard, an you can cut it if you wish, but next time wait and see the difference!