Archives

Sourdough Foccacia

Unbaked foccacia looking wonderfully bubbly and ready to bake

There is nothing easier and nothing better than sourdough foccacia, it’s a great crowd pleaser, and so so moreish. I have made it so many times and it is very forgiving it just bakes up beautifully without any hassles, and we love that sort of recipe right?

This is an easy method, and a good recipe to try if you haven’t made it before or if you’re not having any luck with previous attempts.

There is no need to build a levain, just use some of your sourdough starter when it’s mature and ready to go. You can also add some whole-wheat flour if you choose to, I didn’t, but my starter is fed with 1/3 rye flour all the time.

Ingredients:

  • 210gms strong bread flour
  • 155gms spring water
  • 20gms extra virgin olive oil
  • 6gms sea salt
  • 75gms mature sourdough starter

Method:

  1. Mix everything except the olive oil together either by hand or use a stand mixer with a dough hook (I used my Kitchenaid mixer) for 1 minute on low speed, then knead for another 5 minutes on speed 2.
  2. Now add the olive oil and knead again for another 5 minutes on speed 2, or you can also do slap and folds if you’re doing this by hand.
  3. Rest for 30 minutes, then do a coil fold, and fold again every 30 minutes until you have done 4 folds.
  4. Stretch into an oiled rectangular baking tin, and cover and cold proof overnight.
  5. Take out in the morning (or later) and let it rest on the bench for about 5 hours before you want to bake it.
  6. Wet your fingers and dimple the dough gently down into the pan base.
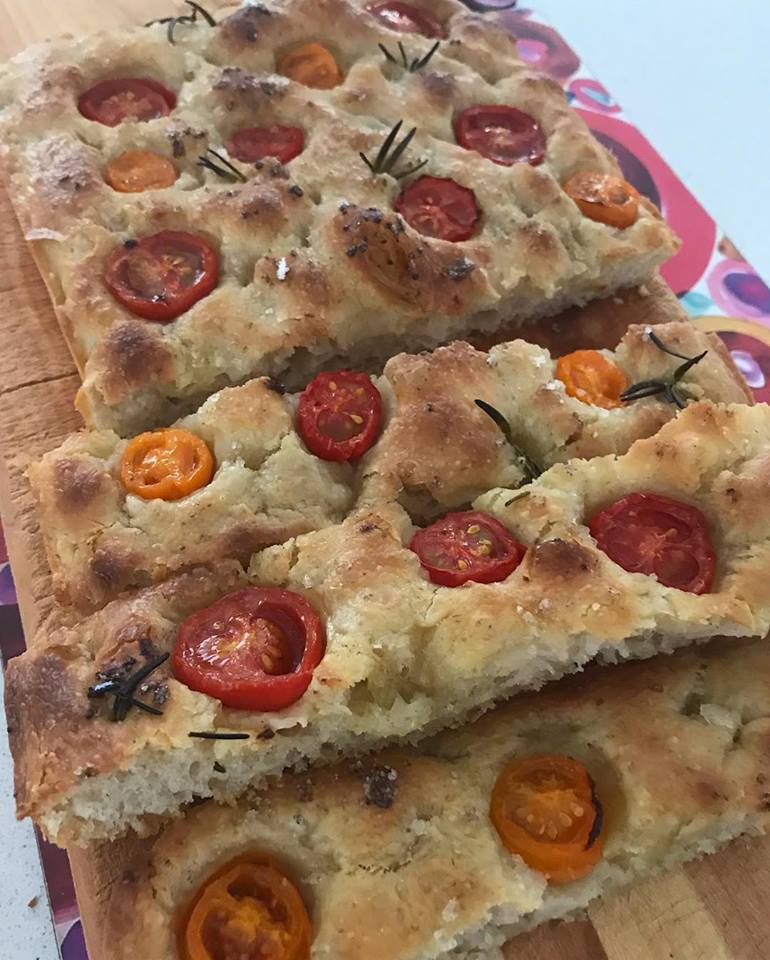
  7. Drizzle over 1 or more tablespoons of extra virgin olive oil and some sea salt flakes, then press some halved cherry tomatoes and rosemary sprigs into the holes evenly spaced around the dough.
  8. Bake at 230degC for 25-30 minutes.

I like to drizzle it with some more olive oil when it comes out of the oven and cooling in the pan for a few minutes before you remove it. It is best eaten straightaway while warm, and best eaten on the day you bake it. That is never a problem here, it is always devoured in one sitting!!! Enjoy!

Sourdough Fruit-bread

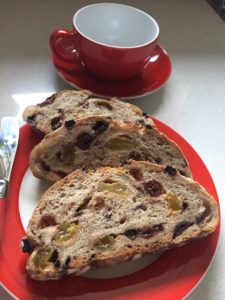
When I started on my sourdough journey I didn’t realise how wonderful every recipe would be…. sourdough fruit bread is soo much better than normal yeasted fruit bread, and as in my other sourdough recipes sourdough flatbread and sourdough banana bread and sourdough pancakes….THEY ARE ALL SO MUCH BETTER…….try them you will totally agree with me.

This beautiful bread is soft and light and fully of goodness with all the dried fruit in it….and it is up to your imagination just what assortment of fruit and nuts you decide to put into your loaf, they all have their unique and wonderful tastes and flavour the sourdough wonderfully.

Ingredients:
Sourdough:
  • 135gms starter
  • 255gms strong bread flour
  • 135mls spring water
  • 7gms salt

Fruit mix:

  • 110gms dried fruits, such as golden raisins, cranberries, currants or sultanas.
  • 70ml water

Method:

  1. Soak fruit mix in the water overnight covered with plastic wrap, or for at least 8 hours.
  2. Drain, and add spices, and set aside until needed
  • ½tsp ground cinnamon
  • ¼tsp ground allspice
  • ½tsp ground nutmeg
  • ¼tsp ground cloves

Extras:

  • 35gms toasted nuts such as hazelnuts, pecans or walnuts (optional) I don’t always put nuts in.
  • 40gms rye starter extra

Method:

  1. To make the sourdough, mix the starter with the flour and water in a large bowl with your hands until it comes together.
  2. Hand or machine knead for 10 minutes (7 minutes if using a machine), cover with plastic wrap and rest for 20 minutes.
  3. Sprinkle the salt over the dough and knead for another 15 minutes (7 minutes if using a machine) until smooth an elastic.
  4. To see if the dough is strong enough, stretch out a little piece with your hands, it shouldn’t tear, if it does knead a little more.
  5. Combine the fruit mix and spices with the extra starter and nuts (if adding them) and lightly mix through the dough, can be done with your mixer for 3 minutes on slow speed.
  6. Lightly grease inside the bowl with olive oil and cover with plastic wrap and rest for 1 hour to prove.
  7. Give the dough several folds, turning the bowl as you do it.
  8. Cover and rest for another 1 hour.
  9. Turn onto a lightly floured board and shape into a round or batard by stitching or folding depending on what method you prefer, I prefer stitching.
  10. Place into your banneton, or basket lined with a tea towel, or linen which have been lightly dusted with flour.
  11. Dust the top of the dough and loosely cover with a plastic shower cap, and place into the refrigerator for 8-12 hours.
  12. Preheat oven to 220°C and bake in your dutch oven with the lid on for 15 minutes, then take the lid off and bake for a further 20-25 minutes until browned to your liking and when you tap the base it sounds hollow, then it is done.  This timing with the lid off may vary according to your oven, it may take a little longer, but the tapping on the base will tell, and always keep and eye on the loaf as fruit loaves can brown quicker and you don’t want it to burn.

Just out of the oven a soft moist sourdough fruit bread made with pre-soaked cranberries, raisins and currants and freshly ground cinnamon, nutmeg, cloves and beautiful allspice….the aroma in the kitchen is divine ?

Posted by Monreale's Cooking Inspirations previously B & B on Saturday, December 9, 2017

Enjoy and let me know how your sourdough fruit- bread was enjoyed, I find it’s easier and more forgiving than regular sourdough bread.


This entry was posted on December 17, 2017, in Recipes.

Spicy Lentil Pies

I have been making these delightful little pies for years, as one of my family members has been a vegetarian for years, and funnily enough all the meat eaters love them too!  This often happens when I serve a vegetarian dish I have to make plenty for everyone, not just the vegetarian.

They are fairly easy to make, especially if you use store bought pastry for the bases and the top, and lately I have been sprinkling poppy or sesame seeds on top for a pretty effect.  A great treat for the non-meat eaters at your table….enjoy making them as much as eating them!

Ingredients:

  • 2 tbsp olive oil
  • 1 onion, chopped
  • 1 carrot, peeled and diced
  • 3 cloves of garlic, finely chopped
  • 2 tsp ground coriander
  • ½ tsp ground cinnamon
  • ½ tsp ground cloves
  • 1 tsp ground turmeric
  • 2 tsp ground cumin
  • ½ tsp cayenne pepper
  • 1 large tomato, diced
  • 1 cup brown lentils, washed
  • 2 sheets of ready made shortcrust pastry, thawed
  • 2 sheets of ready made puff pastry, thawed
  • Poppy or sesame seeds for sprinkling on top

Method:

  1. Heat the olive oil in a large saucepan, add the onion and carrot and cook stirring for 7 minutes, or until the onion Is soft.
  2. Stir in the garlic and cook for 2-3 minutes, then add the spices and stir for 1 minute until fragrant.
  3. Add the tomato, lentils, 1 tsp of salt and 1 litre of water.
  4. Bring to the boil, then reduce the heat and simmer for 30-40 minutes, or until the lentils are soft and most of the liquid is absorbed.
  5. Add more water if it is too dry.  Season with salt and pepper.
  6. Allow to cool slightly before adding to the pie cases.
  7. Heat oven to 180°C, and grease a 12 hole cupcake tin, (it doesn’t really matter what exact size they are)
  8. Cut the shortcrust pastry to fit inside the holes of the cupcake tin, prick the pastry with a fork, and bake for 5 minutes just to set the bases so the lentils do not make them soft when added.
  9. Add about a tablespoon full of the lentils to sit just level with the top of the pastry.
  10. Cut the puff pastry to fit the size of the tops of the pies, and seal the edges, prick top one with a fork to allow steam to escape.  Sprinkle with poppy or sesame seeds.
  11. Bake for about 10 minutes or until the pastry is browned on top and puffed up.
  12. Allow to cool slightly and carefully lift out with a spoon.
  13. Serve with a nice tomato relish, or just on their own.

Enjoy these lovely little alternatives to beef pies and let me know what you thought of them by leaving a comment below ♥

This entry was posted on December 17, 2017, in Recipes.

Sourdough Banana bread

I just adore banana bread, mind you I have tasted some really good ones in my life and some really dry terrible ones too.  The best ones I find are moist, crumbly and not dense, and have walnuts inside and on top….yummo ♥

This recipe can also be considered healthy as there is very little sugar (½ cup only) in the whole loaf, and it is also made with spelt flour, well known for it health benefits as an ancient grain, and much kinder to our tummies.

Here I have added not only a wonderful moist, healthy and delicious banana bread recipe, but I have found another way to use up some of that starter discard we have every time we feed our beloved starters.  Along with the other two recipes for pancakes and flatbread, this recipe is wonderful, and much, much better in my opinion than normal banana breads.  It will stay moist for a few days if wrapped in foil…..well if it lasts that long!

Try it an  let me know I promise you wont be disappointed ♥♥♥

Ingredients:

  • 115gms unsalted butter
  • ½ cup brown sugar – lightly packed
  • 170gms sourdough starter (or 3/4 cup)
  • 1 cup spelt flour
  • 1 cup plain flour
  • 3 really ripe bananas – mashed
  • 1tsp pure vanilla essence
  • ¾ cup walnuts – chopped
  • 2 tbsp extra virgin olive oil
  • 2tsp honey
  • 2 free range eggs
  • ½tsp sea salt – fine
  • ½tsp baking soda
  • zest of 1 lemon

Topping:

  • In a small bowl mix together 3 tbsp chopped walnuts and 1 tbsp brown sugar.

Method:

  1. Preheat your oven to 155°C fan forced (175°C if not fan forced).
  2. Grease a 23cm x 13cm loaf tin and line the bottom and up two ends with baking paper – this not only stops it sticking but makes it easier to lift out of the tin.
  3. In the large bowl of your stand mixer, beat butter and sugar until creamy.
  4. Add the eggs one at a time, and scrape down the sides of the bowl from time to time.
  5. Add sourdough starter, honey, mashed bananas, vanilla and olive oil.
  6. Mix the two flours together with the baking soda and salt and add gradually to the mixture.
  7. Keep scraping down the sides.
  8. Now fold in the lemon zest and walnuts with a spatula.
  9. Pout the mixture the loaf tin, and smooth the top with the spatula.
  10. Sprinkle on the chopped walnuts and sugar.
  11. Bake for 55 minutes.  Leave to cool in the tin for 15 minutes, then lift out with the two ends of the baking paper and place on a wire rack to cool………or of course eat straight away while still warm with butter…lots of butter!


Hummus


Ingredients:

  • 400gm can of chickpeas
  • 2 tbsp tahini
  • 1 clove of garlic, crushed
  • ½ tsp salt
  • Juice of half a lemon
  • 3 tbsp extra virgin olive oil
  • Reserved liquid from the chickpea can

Method:

  1. Drain the chickpeas, reserving the liquid and a few chickpeas for decoration
  2. Rinse chickpeas in cold water and tip into a food processor
  3. Add tahini, garlic, salt, lemon juice, olive oil and 3-4 tbsp reserved liquid from the chickpea can.
  4. Mix until fully combined and smooth and then tip into a serving dish.
  5. Drizzle with some more extra virgin olive oil and decorate with a few whole chickpeas.
  6. Sprinkle with smokey paprika and finely chopped parsley.
  7. Enjoy with my falafel patties (click for recipe)!
This entry was posted on October 3, 2017, in Recipes.

Lemon Cake with Lemon Curd filling

This is the most wonderful lemon cake you will ever make (and eat) it is so light and delicious and topped off with beautiful lemon curd and strawberries it is a winner.  Not only does it taste wonderful it is a stunner in looks.

I often make it for friends and family and it is constantly requested, along with my pavlova  as they are not heavy and I think that is an issue with most cakes, and desserts, no one wants to feel too full or bloated after enjoying a piece of cake…heaven no…room for more please!

Ingredients:

  • 100g unsalted butter, softened
  • 165g caster sugar
  • 1/2 tsp vanilla extract
  • 2 eggs
  • 1¹⁄³ cups self raising flour
  • 125ml milk
  • zest of 3 lemons
  • Lemon curd
  • Strawberries for decorating
  • Icing sugar to dust on top

Method:

  1. Preheat the oven to 180C° (160C° fan forced).
  2. Grease a 20cm cake tin and line the base with baking paper.
  3. With your mixer beat the butter, sugar and vanilla until light and creamy.
  4. Add the eggs one at a time, beating well between additions.
  5. Fold through the flour and milk in two alternate batches until just combined.
  6. Then gently fold through the lemon zest.
  7. Tip the mixture into the cake tin and bake for 35-40 minutes, or until the cake springs back when touched gently in the centre.
  8. Remove from the oven, let cool 5 minutes in the tin, then transfer to a wire rack to cool completely before decorating.
  9. With a sharp knife slice a circle from the top of the cake.
  10. Spread lemon curd inside the removed circle area.  Decorate with halved strawberries.
  11. Replace circle of cake back on top.  Dust with icing sugar.

Enjoy…and please leave me a comment below if you have made this and really enjoyed it as much as I do♥

Sourdough Flatbread

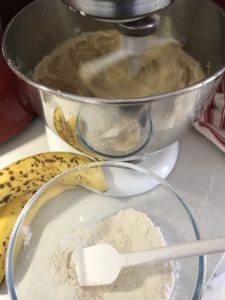
I really enjoy finding new ways to use up the discarded sourdough starter when I feed it each time.

Here is a wonderful way, and you will never to back to normal flatbread once you have made these, they are so light and airy, and wonderful to use in many ways.

I generally make them when I lave left over roast meat, they make wonderful wraps, just spread some beautiful hummus or baba ganoush on the flatbread, then just pile the sliced or pulled meats on top, add slice onion, lettuce tomato or anything you fancy…..delicious!

Video below show you how beautifully they puff up.  Recipe makes 4 depending on the size you make them.

Ingredients:

  • 1 cup bread flour
  • Few pinches of sea salt
  • 1 tbsp sourdough starter
  • ½ cup warm water

Method:

  1. Mix all the ingredients together.
  2. Knead for a few minutes, then cut in two and roll out on a floured surface.
  3. Place into a really hot frying pan,( no oil needed),  turn when it has browned spots, once and watch it puff up!


Sourdough Pancakes

 Wonderful way to use up your discarded starter, freshly made for breakfast they are divine!  It is surprising how light and fluffy they are, much nicer than the traditional pancakes, and much healthier too! 

It only takes 5 minutes to make the mixture, leave for 30 minutes to let the starter give the batter a boost, and you have beautiful pancakes for breakfast ♥

I’m always trying to find ways to use the starter which is discarded each time we feed it, and this is a winner.

Makes 4-6 depending on how large you make them.

Ingredients:

  • 2 eggs, large
  • 1 cup milk
  • 1½ cups sourdough starter
  • 1½ cups plain flour
  • 1 tsp baking powder
  • 1 tsp baking soda
  • 1 tsp sea salt
  • ¼ sugar
  • ¼ butter, melted

Topping:

  • 1 punnet strawberries, cut in quarters
  • Golden syrup, maple syrup or honey (whichever you prefer I like golden syrup)
  • Butter to dollop on top

Method:-

  1. Beat eggs in a medium bowl, add milk and sourdough starter, stir to combine.
  2. Sift together flour, baking powder, baking soda, salt & sugar.
  3. Add to the eggs mixture and mix well.
  4. Stir in the melted butter.
  5. You may need to add a little more milk if the matter is stiff, it depends on the consistency of your sourdough starter.
  6. Wait about 20-30 minutes to allow your sourdough starter to give the batter a boost.
  7. Lightly grease a heavy frying pan on low-medium heat, drop the batter onto the pan and cook until light golden brown and bubbles are starting to appear on top, then flip over and cook on the other side.
  8. Don’t flip over more than once, it is sufficient to cook them through by flipping only once.

To Serve:

Heat plates while the pancakes are cooking, and place each one on a heated plate, drop dollops of butter around the pancake, top with strawberries and drizzle syrup over (as much as you like…the more the better I say!)

Enjoy!  Please leave a comment below as I love feedback on this recipe if you have made it. 


Curried Vegetable Pies

I love these little pies they are so easy to make and are a great vegetarian option for a meal or for those ‘meat free’ nights I have once or twice a week.  Not only are they delicious but also nutritious having several different vegetables in them, and  they are also topped with melted cheese for added protein.  You can also add some tinned or stewed lentils for that extra protein dimension.

Try these they are just delicious ♥ 

Ingredients:

  • 2 potatoes, peeled & chopped
  • 250gms pumpkin, peeled & chopped
  • 125gms kumera (orange sweet potato) peeled & chopped
  • 1 large carrot, peeled & chopped
  • 1 small onion, peeled & chopped
  • 50gms butter
  • 1 tbsp curry powder
  • 1 tomato, chopped
  • ½ cup peas (frozen as they cook faster)

Method:

  1. Boil potato, pumpkin, kumera and carrot until just tender, drain.
  2. Saute the onion in the butter until soft, add curry powder, stir through, and saute 1 minute.
  3. Add vegetables to the pan and add a little water and toss through.
  4. Add tomato and peas, and cook for 5 minutes.
  5. Place in partly cooked pie shells, and sprinkle with grated tasty cheese.
  6. Place in a moderate oven until the cheese is melted….yummo!

Pastry – Thaw one sheet of shortcrust pastry, and cut to size and place in greased 2 small pie tins.  Prick with fork and bake a few minutes until partially set.

serves two


Let me know how these little pies turn our for you they are a great staple ♥


Falafel Patties

This is a great recipe I’ve taken the video directly from my Instagram page.  Many of my followers loved it ♥

Ingredients:

  • 2 cups dried chickpeas – don’t substitute with canned, they are too soft
    1 small onion, roughly chopped
    ¼ cup parsley, chopped
    2 cloves garlic
    1½ tsp chickpea flour
    1¾ tsp salt
    2 tsp cumin
    1 tsp ground coriander
    ¼ tsp black pepper
    ¼ tsp cayenne pepper
    Pinch for ground cardamom
    Vegetable oil for frying (preferably canola)

Method:
1. Put the chickpeas into a large bowl and cover them with cold water, let them soak overnight.
2. They will double in size as they soak, you will have between 4-5 cups of chickpeas after soaking.
3. Drain and rinse the chickpeas well.
4. Pour them in to a food processor along with the chopped onion, garlic cloves, parsley, chickpea flour, salt, cumin, coriander, black pepper, cayenne pepper & cardamom.
5. Pulse all ingredients together until a rough coarse meal forms.
6. Scrape down the sides and process until the mixture is somewhere between the texture of couscous and paste.
7. You wan the mixture to hold together but you don’t want it turning into hummus.
8.Once the mixture is the desired consistency spoon it into a bowl and let refrigerate for an hour.
9.Fill a pan with the vegetable oil, and heat.
10.Roll into balls or patties and fry until golden.

Serve with home made hummus (recipe coming on the website) and freshly made tabouli.
Let me know with a comment below if you really like this recipe.